Project 1: learning your tools and
teleoperation
Summary: In this first project, we will get used to the ROS2
system, ensure that it works for your group and experience the keyhole
problem with teleoperation.
Details:
Setting up your laptop to talk to the robot
For this project you will first set up at least one machine capable of
working with ROS2.
- Get a computer running and Ubuntu 22.04 (long term service) varient
[as discussed in class, ROS2 does work on 24.04 as of last month,
but we didn't have a chance to move everything to the next version]
- plain ubuntu works, as does kubuntu, mint and popOS
- I've had someone try WSL for me and it is very tricky, you have to
really dig deep into the way networking is forwarded to the WSL guest
from the Windows system.
- Using a VM works, but you have to forward several ports in the VM
setup between the guest and host OS
- using a dual boot machine works out of the box.
- Once you have your linux system, you need to install ROS2 (the Robot
Operating System) on your ubuntu laptop. follow the directions on this
page here:
- https://docs.ros.org/en/humble/Installation/Ubuntu-Install-Debs.html
- Once you hit the section entitled Next
steps after installing you are done
- Next setup the turtlebot4 ROS2 modules on your computer
- run
sudo apt update && sudo apt install ros-humble-turtlebot4-desktop
- Setup your computer to talk to the robot assigned to your group.
- We are using robots setup to use the discovery server which requires
the use of namespaces
- The namespace of the robot is written in silver pen on the top of
the robot (for example one is "rossy18")
- Run the following command (taken from the PC setup section of https://turtlebot.github.io/turtlebot4-user-manual/setup/discovery_server.html)
wget -qO - https://raw.githubusercontent.com/turtlebot/turtlebot4_setup/humble/turtlebot4_discovery/configure_discovery.sh | bash <(cat) </dev/tty
- When prompted use the following values
- ROS_DOMAIN_ID: 0
- Discovery Server ID: <use the last two digits of the namespace
- so for rossy18 enter 18>
- Discovery Server IP address: <use the IP address displayed on
the robot front panel display>
- Discovery Server port: <keep the default>
- each group is only using one robot, so press 'd' for done at that
point.
- you will now be prompted for the sudo password
- This script will modify your ~/.bashrc file - source it
source ~/.bashrc
- make sure the ros2 daemon is in the correct state - run
ros2 daemon stop; ros2 daemon start
- make sure the robot can talk to your computer, the docs say you
might have to run the following command twice (academic software) if
you don't see the full list the first time
ros2 topic list
- the output should look something like this
(here the namespace is comp86)
shinjitsu@pop-os:~$
                  ros2 topic list

                  /compy86/battery_state

                  /compy86/cmd_audio

                  /compy86/cmd_lightring

                  /compy86/cmd_vel

                  /compy86/diagnostics

                  /compy86/diagnostics_agg

                  /compy86/diagnostics_toplevel_state

                  /compy86/dock_status

                  /compy86/function_calls

                  /compy86/hazard_detection

                  /compy86/hmi/buttons

                  /compy86/hmi/display

                  /compy86/hmi/display/message

                  /compy86/hmi/led

                  /compy86/imu

                  /compy86/interface_buttons

                  /compy86/ip

                  /compy86/joint_states

                  /compy86/joy

                  /compy86/joy/set_feedback

                  /compy86/mouse

                  /compy86/oakd/imu/data

                  /compy86/oakd/rgb/preview/camera_info

                  /compy86/oakd/rgb/preview/image_raw

                  /compy86/oakd/rgb/preview/image_raw/compressed

                  /compy86/oakd/rgb/preview/image_raw/compressedDepth

                  /compy86/oakd/rgb/preview/image_raw/theora

                  /compy86/odom

                  /compy86/robot_description

                  /compy86/scan

                  /compy86/tf

                  /compy86/tf_static

                  /compy86/wheel_status

                  /diagnostics

                  /parameter_events

/rosout- Here is a further test to make
sure you are getting information from the robot properly, from
your laptop command line
shinjitsu@pop-os:~$ ros2
                topic echo /compy86/battery_state

                header:

                  stamp:

                    sec: 1737747924

                    nanosec: 529820197

                  frame_id: ''

                voltage: 15.46399974822998

                temperature: 34.849998474121094

                current: -0.8830000162124634

                charge: 1.621999979019165

                capacity: 2.0280001163482666

                design_capacity: 2.0280001163482666

                percentage: 0.800000011920929

                power_supply_status: 0

                power_supply_health: 0

                power_supply_technology: 0

                present: true

                cell_voltage: []

                cell_temperature: []

                location: ''

                serial_number: ''
TroubleShooting:
I've found through testing, that if it seems like you did everything
right, sometimes the ros system crashes on the robot. To fix that you want
to
- ssh into your robot
ssh ubuntu@<your robots IP address>
- follow the directions to use robot upstart
Your Robot Task.
Now that your laptop is setup, it is time to learn to make your robot do
something. For this first project, We'll walk you through things fairly
thoroughly.
- First work through the tutorial on building your first node in python
- https://turtlebot.github.io/turtlebot4-user-manual/tutorials/first_node_python.html
- remember that we are using namespaces - so when the tutorial uses a
node name without namespaces
- eg
'/interface_buttons'
- You will need to prepend the namespace for example
'/rossy18/interface_buttons'
- next begin a new node project as you did in the previous tutorial,
This one will be a locally edited version of the teleop twist keyboard
program which comes with the turtlebot4 software but doesn't support
namespaces.
- once you have run the create script, navigate to the python file for
the node and use the code from the base teleop twist in your node file
https://github.com/rohbotics/ros2_teleop_keyboard/blob/master/teleop_twist_keyboard.py
- now edit this teleop program to use the right namespace.
- The quick and dirty way is to edit the 'cmd_vel' section of the
program to prepend it with your robot's namespace
- The fancier way is to have the program take the namespace as a
parameter when running your teleop node.
- run your new node that re-implements the the teleop program. If you
did it correctly, you can now control your robot from your keyboard
- install the navigation (only needs to be done once)
sudo apt install ros-humble-turtlebot4-navigation
- launch rviz - a tool to visualize some of the sensor data from the
robot. We will use the model version of the command as seen below
- ros2 launch turtlebot4_viz view_model.launch.py namespace:=/compy86
- here comp86 is the namespace for the robot I was using, you change
it to the namespace for the robot you are using.
- You should now see a window that shows a rough outline of the 'walls'
that the robot can see (see picture below)
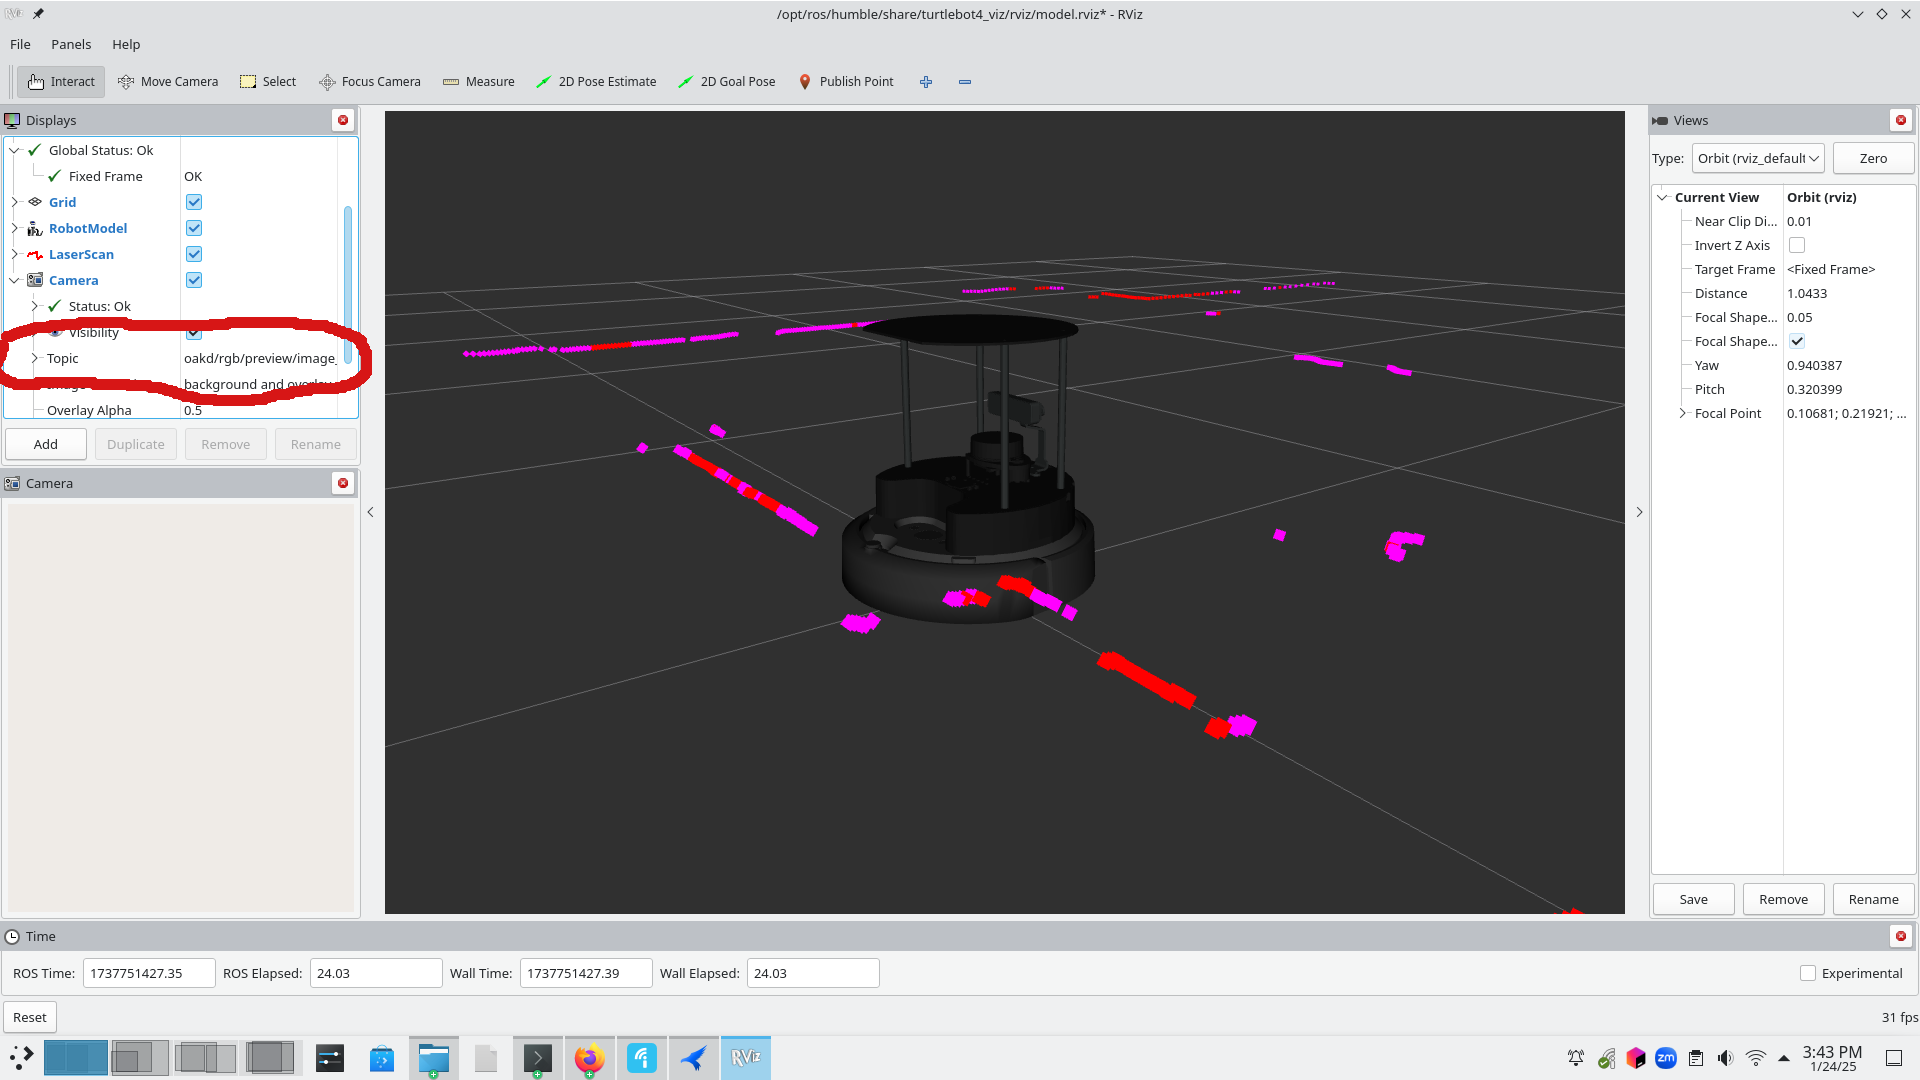
- If you don't see the camera panel hit the add button and add it.
- unfortunately, the camera doesn't pay attention to the
namespace command line argument, you need to go to the camera topic
(circled in red above) and prepend the topic with your robot's
namespace. For example if I was using compy86, my topic would looks
like:
- /compy86/oakd/rgb/preview/image_raw
- NOTE!!!! the laser ranger finder (lidar) will build the 'walls' and
display on rviz while the robot is charging, but the camera will not
display until the robot is off the charger.
- practice running the robot around using keyboard navigation and the
rviz display while not seeing the robot itself
The Graded Demo
On the due date of the project, your instructor will show your group an
object, then go place the object in another room, your group will have to
navigate using teleoperation (not seeing the robot) and find the object and
drive the robot next to the object.)
The Graded Paper:
For the class after the demo - bring in a paper (hard copy - one per
group) double spaced in proper business English discussing your robot
using the following outline
- Introduction (what did you do and why should anyone care)
- Hardware (a paragraph or so explaining the robot and its capabilities)
- software (a paragraph explaining how you re-implemented the teleop
twist keyboard)
- Pittfalls (I'm going to have a group of undergrads doing this class
soon, what do you wish you knew before you started - if I were to give
this paper to those undergrads what would help them?)
- the main part of the paper A fairly detailed discussion of the ups and
downs of teleoperating a robot like this, consider operator fatigue, the
keyhole problem, the challenges of working with limited sensor input
compared to the sense data you usually get as a human
- conclusion/evaluation, how is this robot to work with - particularly
teleoperated - so far.