Comp 102 Project 3
Due: Wed March 24th. This seems like a long time from now, but because of break it is not. You need those two weeks (not counting break) so don't start at the last minute you will not finish.
Summary:
You are going to experiment with inheritance and polymorphism in this lab along with learning to work with existing code.
Details:
I have written a several supporting files. You do not need to read or
understand them, though you are welcome to do so if you want to. You
will need to collect the starter files from my directory on the server.
Login to csdev01 and then type
cp ~jsantore/project3start.zip .
note that the last '.' character is required and has a space between it
and the end of the zip file name. for those of you not used to unix
this command means copy the file project3start.zip which is in my home
folder to your current folder (which should be your home folder since
you just logged in)
once you have it in your home folder you can unzip the file
unzip project3start.zip
and you will see that you now have a project3 folder with several java files and a text file in it. Compile everything with
javac *.java
This line tells the system to use the compiler on every java file in the folder.
To run the program execute the following line at your command line
java Driver
You will see a window pop up on your screen that looks something like this if you are using the default map that I left you:
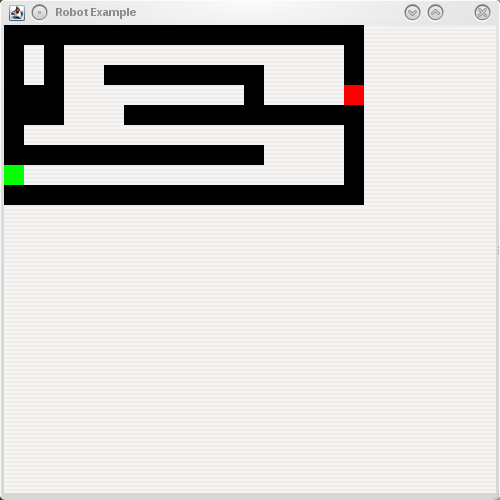
The black represents walls, the green is the start point in the maze
and the red is the stop point in the maze. You are programming a set of
'robots' that will navigatethis maze.
You will use inheritance in this lab. You will be able to safely leave
most of these java files closed and unlooked at if you wish. You will
be implementing the following UML:
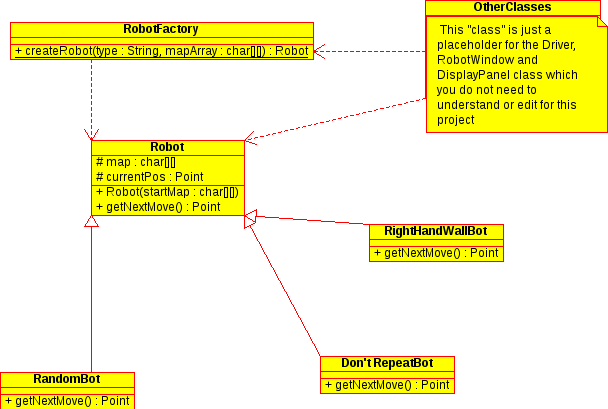
- The Robot class is already implemented as I want it and it should not be touched.
- The RobotFactory class consists of a single static method called
createRobot. You should edit this method to create a robot of one of
the following types: You should create it based on the value of the
String passed in as a parameter to the method. The value passed in will be the second parameter that you pass on the command line.
- RandomBot
- DontRepeatBot
- RightHandWallBot
- You must then implement three subclasses of Robot. Each one must
over-ride the getNextMove method from the robot class. This method
returns a Point object from the java.awt package. The highlight of this class is the fact that it has two public instance variables called x and y.
- RandomBot should randomly move to an adjacent non-wall space
- RightHandWallBot should follow the wall at its right hand side
at all times. You will almost certianly need an extra instance variable
and/or method here. You need to keep track of the direction that robot
is facing in order to determine which direction is right. Limit
yourself to the four cardinal directions (left, right, up and down in
our case) to make all of our lives easier.
- DontRepeatBot will try to find its way out without ever entering an area that it previously entered.
In all cases your bot should return null for the point when it reaches
the stop point. If you DontRepeatBot has no further moves available to
it, you can return null from it too. This will end the search.
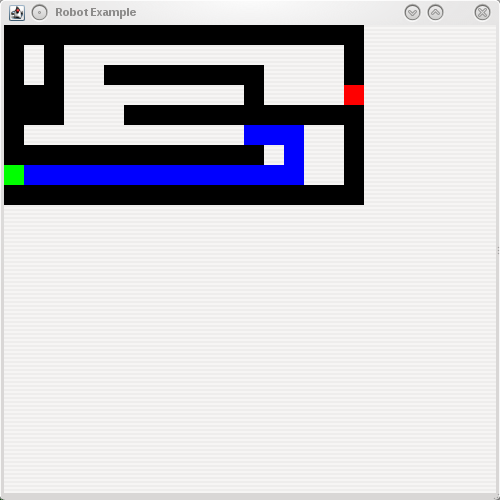
When you have a bot running, the bot's path will be calculated and
displayed about twice a second. The bot path will be displayed in blue
as you see in the image below.
Command Line options for the program:
When you run the program the system is really looking for two command line options.
- The first one should be the name of the map file. (you should make at least one other map file and try your program with it)
- The second one should be a string for the type of robot the user wants to create
So for example I might call the program using
java Driver map2.txt Random
to ask the program to use the map in map2.txt and try it with a
RandomBot robot. This string is the one that will be passed to you as
the type string in RobotFactory.createRobot.
A word about the map files.
There are several constants declared in the RobotWindow class which
determine what characters are interpreted as walls, start position and
so on. You are encouraged to have a look. To get you started here is
the relevent section.
public static final char WALL_CHAR = '*';

  public static final char START_CHAR = 'S';

  public static final char END_CHAR = 'Y';
So use these characters when making your own map files.
Readme:
You also need to have a readme.txt file in your folder which contains
- your name
- a brief (one paragraph) description of how
you implemented the project,
- A list of acceptable command line arguments. What did you use to select a Robot type? What map files would you like me to use in addition to my own.
- anything that is left undone in the project.
Submission:
As before, you need to submit using csdev01:
from the command line on csdev01, use the following line to move into
my directory
cd /home/bscstaff/jsantore/onlineSubmit
then use this line to run the submit program:
./submit.sh &