CS460 Project 2
Due: In class demo: Thursday April 6th with project
report turned in the following Tuesday April 11th. One report per group.
Overview and Objective:
You will design and program a robot which will navigate a random 3
dimensional environment with both walls and debris. The robot's goal is
to find a light which will be somewhere in the environment. Your robot
will start in one corner of the enclosure and then have to search for
the light, stopping and playing a tune when the robot is near the light
with no barriers between the light and the robot.
Materials:
Your lego bins have been updated. The RCXs and their paraphenalia have
been removed. They have been replaced by handyboards like the one used
in the original lab. You will have
- A handyboard (with charger and interface board and cables)
- ET sensors (2)
- Top Hat sensors(2)
- Touch Sensors (several and varied)
- Light sensors (2)
- Breakbeam encoder
- Lamp and maze (shared with all groups in the class)
- 2 handyboard to lego motor wires
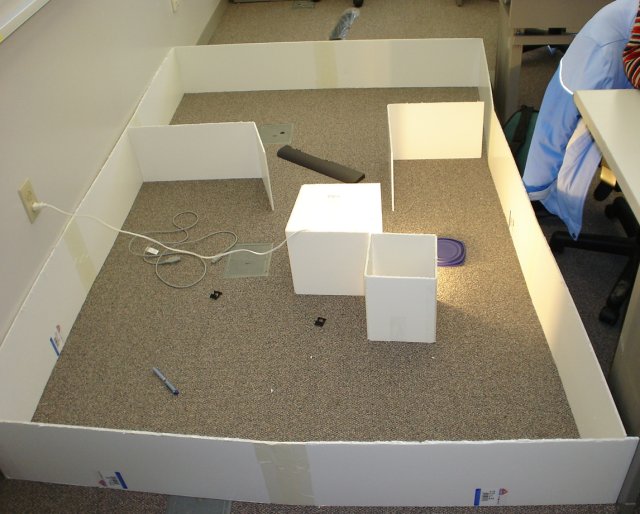
The maze:
The maze is constructed of foamboard. There are two large pieces of the
maze near the cabinet. Each consists of a side and end of the maze with
a hinge made of tape holding them together. These form the outer edge
of the maze. Setup the maze so that these two peices form rectangle.
Then use the remaining peices of foam board placed randomly as
obsticles inside the maze itself. See the photos below for two
examples. Somewhere in the maze, place the light. In final test runs,
the light will always be shielded from easy view as it is in the
examples below. In addition to the reconfigurable walls, there will be
debris in the maze. the walls are all about 25 cm high. The debris will
never be more than 2cm high and much of it will be the sorts of small
items that you see in the pictues below.

Your Task:
You are to create a robot that can find a light in an arbitrary maze
with debris in it. For more information about the maze construction,
see the section on the maze above. Your robot will start in one of the
four corners of the maze (chosen by the instructor on demo day) and
will have to find the light. When the robot finds the light, it should
stop no more than 12-13 cm (about 5 inches) from the light and play a
tune for about 4 seconds. Once you start the robot in its corner, you
cannot touch it again until it either runs out of time or claims to
have found the light and stopped. Your robot has five minutes to
perform this task.
The software environment:
For this lab we will be using the Interactive C environment. We will
have a brief lecture about Interactive C on the day the lab is
assigned. The IC tools are in /opt/InteractiveC6 on your computers. You
should cd into the directory and then run the main executable by running
./icgui
icgui is in your path, however, if you try to run it from outside of
its own directory, the machines currently do not find the libraries and
you will see a blank listbox and a prompt to select the sort of robot
controller that you will use.
When you run icgui, select the handboard as your robot controller. You
will then be prompted to select the port. Select com1 or com2 depending
on which port you plugged the controller into. You may have to download
the firmware before proceeding. (we will cover how to do that in class,
there is also a tutorial for downloading the firmware available from IC
itself.) After IC connects to the handyboard, you will be presented
with an IDE for writing, compileing, downloading and debugging
Interactive C code on the handyboard.
A few useful notes
- Most of the handyboards are not currently charged. setting
everything up and connecting the handyboards to all of their cables
(we'll look at how to do this in class) will begin the
trickle-charging. Leave them charging while you are designing and
writing your code. If you ever start to see wierd behavior running the
same program that used to work, try recharging the handyboard.
- All of the issues that you learned about in your last lab still apply including
- sometimes the same powerlevel produces different speeds in different motors
- sometimes the same stimulus will produce different output from two different sensors.
- Check to see if your sensors are working. I know one of the
handyboard has an issue with one of its sensor ports (I think it was
port 16) check to see that you get readings that seem reasonable from
test stimuli.
The Project report
The project report is a report of what you tried to do, what you did,
what you learned and what you accomplished. To make my correcting
easier, let me give you guidlines on what I'd like to see in it. Make
sure you use section headings to make each section easy to find.
- Introduction
- this is where you explain the problem you wer trying to solve and why it is relevent
- Robot design
- Here tell me what sort of robot you designed (in hardware).
Tell me what worked and what did not work. Discuss what you learned
based on what worked and what did not.
- Software design
- Here discuss what sort of control program you built. Again tell
me what worked and what did not. Discuss what you learned about robot
control software from your experience. Discuss your approach and its
relevence to both the current task at hand and the general problem of
robots acting in the world.
- Evaluate your robot
- Fro both design robot and software design, consider the four
standards we are using to evaluate a robotic architecture and consider
how your robot meets each of them. For niche targetability, include
your robot's actual performance in the demo.
- Concuding discussion
- Summarize what you learned. Consider the following target
audience: next year's robotics students. In this section, summarize
from the preceding sections all of the worthwhile dos and don'ts that
you discovered in doing this lab. It is not really relevent that your
robot did really great unless you tell the reader why. Think about what
you would have liked to know when you first saw this lab, and if you
have any insights after doing the lab, share them here.