
comp101 Introduction to Computer Science I
Lab #1 Introduction to Unix
Introduction
In this first lab you will be introduced to the computing environment using Computer Science compute server, csdev01. csdev01 is the name of our "log in from anywhere and do significant work" style compute server on the Bridgewater campus. (it used to be called eagle, so there is some chance that I will still call it eagle from time to time. csdev01 is a Red Hat Linux based server.
Many of you are very familiar with MS windows and some of you with Apples Mac OS/X operating systems. Those are fine operating systems used in many situations. However, computer scientists should be familiar and at least somewhat comfortable with a broad range of systems and environments. Computer scientists should have experience with as many systems as possible before they graduate.
If you are familiar with Unix you may know how to do some or all of the following tasks. Do them all the same. If you are new to Unix, these exercises will get you up and running with most of the tools you need to successfully complete the lab assignments of this course. Some further tools will be introduced as we need them in later labs.
You should plan to work on the lab outside of class time, though I will walk you through the first first couple of steps.
Read through the entire lab before you start working on your own, so that you know what to expect. Make sure you save your work often, and keep track of what you are expected to submit.
Objectives
The objective of this lab is to introduce you to the Unix operating system and some of the tools available to you so that you can work on the labs independently. In support of this objective, you will learn not only the basics of many tools, but also how to obtain further information by consulting on-line documentation.
Preparatory work
Make sure that you can login to the BSC network using your usual username and password.
If you have not already done so, make sure you have bought all of your course textbooks. ( Just one in this class).
Lab Tasks
Your instructor has briefly gone through the tasks listed below during lecture to help prepare you for this lab. We will do the first task or two in class. You must then carry out each of the following tasks on your own in the lab or logging in from your computer at home.
Logging in - Connecting to the system
Your first lab task is to log in to your eagle/csdev01 computer account. Your csdev01 account is for the computer science server only. This account is separate from your regular BSC account. (If you change the password for one - the other password will remain the same.)
*
Your instructor will give you your csdev01 account user name. These usernames are autogenerated based on the class you are taking, and are therefore unfortunately not at all intuitive.
*
We will start X-Windows from the beginning. On the lab
machine, select <start><departments>
<math & computer science><xming>xlaunch
You should now see the first dialog from the xlaunch application as you can see in the image below:

just click the next button, and keep doing so till you get a finish button in that location. Press finish at that point and the dialogs will go away and you will be left with just a little 'X' icon in your system tray. This is what you want.
On windows we use a program called putty to connect to csdev01. To run putty on the lab machines, choose the run option from the start menu and type putty into the box that comes up.

Hit ok and you will see the following warning:

You can unselect the "always ask before opening this file" checkbox and choose the run button.

Next Scroll down the tree control and expezt the SSH option and choose the X11 section. Check the checkbox for 'Enable X11 forwarding'

Now scroll back up and select the session item from the tree control. Type in csdev01.bridgew.edu in the box for Host Name. Type in csdev01 in the saves sessions box and then press the save button. If you've done everything up till now, you will only have to hilight csdev01 from the saved sessions list box and then press the open button in the future.
Press the open button now. You will get one last one time warning message:

Press yes in response to this warning.
Ssh is a command line program that does the same thing as putty and is available built in on Macs and Linux/Unix computers. If you use one of these machines at home see me for a brieft direction on how to use it to connect.
For windows users can download and install putty at home to give you ssh capability. (see http://www.chiark.greenend.org.uk/~sgtatham/putty/ for the putty home page.)
Your instructor will walk you through logging in for the first time during class.
Note: Unix does not echo a '*' character as you enter your password. The server sees what you type, but doesn't give any feedback to the user - its appears to be doing nothing.
Also note that unix passwords are case sensitive as most are these days.
Linix is the name of the operating system that is running on csdev01. Linux is designed to work like Unix on PC compatible hardware(this is a simplification). An operating system (or OS) provides basic services to both programs (applications) running on the machine and to users who are working on the machine. Examples of services provided by an OS are a facility to read the contents of a file from a disk, or run multiple programs at one time (multi-task).
X-windows is window system, or graphical user interface (GUI) to the underlying Unix operating system. X-windows is thus separate from the operating system. A window system manages windows on a screen and provides a graphical way of interacting with the operating system.
On personal computers it is becoming more and more difficult to distinguish between the operating system and the window system as they are becoming more tightly integrated. In the Unix world, however, the separation is still clear, and it is not uncommon for different users on a given system to use different window systems.
To create a nice new configurable terminal window, type `konsole &' at the Unix prompt in an existing xterm/putty window.
Adding the ampersand (&) to the end of a Unix command makes it run in the background. When a command runs in the background (as opposed to the foreground) you get the Unix prompt back so you can type another command if you wish to. In this way you can multi-task - have several applications running at once!
When you do work on csdev01, you are working on a compute server. You see the same machine and work on the same files whether you are working in our classroom, in the Moakley open access lab or from home.
Unix and utilities
In this section you will experiment with some basic Unix commands, and learn a little bit about the way in which Unix organizes its file system.
Basic Unix directory/(folder) structure
Like most file systems, Unix's is tree-structured. The very top or 'root' of the file system is named `/'. As a user on the system you have a home directory, where all your files are stored. To find out where your home directory is, type
echo ~ When I do this, I find out that my home directory is /home/bscstaff/jsantore. This means that my home directory jsantore is located in the subfolder bscstaff, which is a subdirectory of the home folder, which is an immediate subdirectory of the root directory (which is, as mentioned above, designated by `/'). " /home/bscstaff/jsantore" is a path which describes how to get from one directory (in this case the root directory) to another (in this case my home directory). A path can either be absolute (starting at /) or relative (starting at the current directory). Every directory has two special entries, `.' and `..'. The entry `.' refers to the directory itself, and `..' and refers to the directory's parent directory (i.e. the directory of which this one is an immediate subdirectory). The root directory is the only directory in the file system which does not have a parent directory. (Actually, this is not quite accurate. If you inspect the root directory you will find that there is a `..' entry. The parent of the root directory turns out to be the root directory itself!)
Below I have listed some basic Unix commands. Read the description of each, and carry out any exercises given. Page number refer to page numbers on the handout given in class.
*ls - This command gives a listing of the files in a directory. Without any arguments, it provides a listing of the files in the current directory, and is therefore equivalent to `ls .'. If you specify a directory using a path, ls will respond with a listing of the contents of the specified directory. Try typing ls at the Unix prompt. (note for dos users this is similar to the dir command)
*cd - This command changes the current directory. Without any arguments, it changes the current directory to your home directory, and is therefore equivalent to `cd ~'. If you specify a directory using a path, cd will set the current directory to the specified directory.
*pwd - This command gives the current or present working directory. Unless you have changed your working directory since logging in, typing pwd should return your home directory. Also try using the two commands together, try: ls ; pwd.
*piping input and output - It is possible to make the output of some command be the input of another command. This is done by creating what is known as a pipe between the two commands
*To give you an idea of how pipes
can be useful, consider that there are times when the output you are
asking for takes up more than one screen length. When this happens,
the information simply flies off the screen. (for example try the
command 'ls -l /usr/bin'
to see this happen) If your windows do not have scroll bars,
you have lost the information that is no longer on the screen.
Wouldn't it be nice if you could send the output of the command to
some utility program which displays a screenful of information at a
time
*Fortunately there is such a
utility program, called more.
For example, to pipe the output of ls to type `ls
| more'. The vertical bar (|) is the pipe.
*redirecting output. Sometimes it is useful to have the output of your command go into a file rather than onto the screen. try the following example. Type
echo "Hi there!" > temp
The echo command normally prints to the screen whatever you type. (Try typing echo "TEST" to see how echo normally works). With output redirection (indicated by >) this does not happen. Instead the output of the echo command was redirected into a file named temp. If you list the files is the current directory, you will see an entry called temp.
*more & cat - Now we want to see what the file temp contains. We can do this many ways. The first way is to use more as described on page 17, or with cat as described on page 18. Try either and see what the contents of the file named temp is.
*Using wildcards - Wildcard characters are used in patterns to match filenames. For example, the wildcard character `?' matches any single character. Hence, the filename pattern b?t matches any filename which is three characters long, whose first character is the lower case letter `b' and whose last character is the lower case letter `t'. Examples of filenames which could match this pattern are: bat, bbt, bct, and b1t, among others. Another important wildcard is the '*' wildcard. It will match zero or more characters. So W* will match any filename beginning with a capital 'W'
*man
- The man command (short for manual) brings up a manual page (help
screen) for a specified command. You can also get a help page about
man itself by typing man man. Try
man
passwd | col -b > ~/my.password.manual
This will place a copy of the man page for the passwd command in your home directory in a file called my.password.manual.
Exercize 1(35%)
Setting up your account:
You will need to do two things to setup your account for this class. First change your password to something that you can remember
the passwd command is used to set your password. It is a command line program but is a fairly standard interface. You are first prompted for your current password, then you will be promted to enter and then reenter your new password. Remember that you will not see any characters echoed while you are typing passwords.
Second you need to setup your editor. (more about it below - for now we will just set it up)
use these commands to set things up
mkdir .xemacs (that is dot-emacs in case your font is small)
cp /home/bscstaff/jsantore/.xemacs/custom.el .xemacs
the spaces and the dot characters are all important.
Do the following exercise. You will hand in the result of doing this exercise. In order for your submission to be graded correctly you must follow the instructions given precisely, in the order given, and must not do anything extra.
Make sure your present working directory is your home directory. If it is not, issue a command to make your present working directory your home directory.
* Redirect the output of the pwd command to a file named `Exercise1a'
* Redirect the output of the ls -aR command to a file named `Exercise1b' (note capitalization matters!)
* Create a file named `Exercise1c' whose contents is the manual page for the finger command.
* Create a listing of all the files in /usr/bin which begin with same letter as your last name (in lower case). Redirect the output of this command to a file named file named `Exercise1d'.
Create a file named `Exercise1' which consists of the contents of the files `Exercise1a' through `Exercise1d', in that order.
Next is a list of some fundamental commands which allow you to manipulate and organize files in a Unix file system. Read the description of each, and carry out any exercises given.
*mkdir - This command creates the specified subdirectory. (Often called a 'folder' in todays more Machitosh-influenced discussions.)
*cp - This command copies a file to a new location, leaving the original unchanged. Type
cp
temp anotherTemp
How many files does ls report now?. ( use
man cp and
look at the -r and -i flags to see more ways to used cp)
*More fun with ls - Try using ls -l to see lots of information about the files, ls -F (thats a capital F) to see a '*' after the executable files, and a '/' after all of the folders.
*mv - This command moves a file from one location to another. (this is how you rename in unix unless you are using a gui) A directory is just a special type of file to Unix, so we can rename the directory we just created before by moving it to a new location. Type
mv NewDirectory MyDir to rename the directory. Type `ls'.
*rm - The command rm removes a file. Type `rm temp' followed by `ls'. How many files does ls report now? Type `rm anotherTemp' followed by `ls'. How many files does ls report now? Read more about rm by reading the man page if you like.
*rmdir - This command removes the specified subdirectory. Type `rmdir myDir'.
*Locate if you are looking for a file and forgot where you put it, try using the locate command. type
locate finger to find all of the references on the system to the finger command (which can tell you who is logged into eagle at the moment)
All of these are useful when you find yourself working at the command line, something you will find yourself doing from time to time in an upper level computer science class and in some jobs. However, a modern Linux has graphical tools to allow many basic operations to be accomplished in a manner similar to that used by Microsoft Windows and Apple Macintosh operating systems
From the command line type
konqueror &
konqueror is, like Microsoft Explorer, both a file system browser and a web browser. Konqueror usually starts out in web browsing mode. Lets use it to look at your csdev01 home directory. (i.e. your space on the server, the place you will start working each time you log in.
In the address bar erase the existing test and type the tilde character. '~' and then press enter. You should see the files Exercise1a through Exercise1d. (there might be other files as well.)
Do the following exercise. You will "hand in" (by electronic submission) the result of doing this exercise. You may use konqueror and other tools as you need them.
* Make a new subdirectory of your home directory named `Lab1', and make it your current working directory. (move into it at the command line using cd with the appropriate argument)
* Move (don't copy) all the files from your home directory which start with Exercise to the Lab1 directory.
redirect the output of the following two commands from the command line window that you setup at the beginning of the exercise.
ls ~ (to make sure you moved the files out of your home directory. ) into exercise2a
ls (to see which files are in the current working directory.) redirect to exercise2b
* create a new file from konqueror. It will be blank and thats ok. Name the file comp101.txt
* Create a file named `Exercise2' which consists of the contents of the files `Exercise2a', `Exercise2b', and comp101.txt in that order.
Creating a file
In lab 2 you will be creating and editing files using a quite powerful editor called xemacs. Xemacs allows you to develop, compile and run a java program all from within xemacs. Unix also has simple text editors like Microsoft Windows notepad though I discourage there use for programming . There are lots of ways to create a file on a unix system, but since you will use xemacs most of the time, lets start there.
Start xemacs by typing
xemacs &
at the command line. Remember '&' means roughly "give me my prompt back while running this program"
Now you are staring at xemacs' 'scratch buffer' this is the buffer that xemacs doesn't care about and assumes you don't either. If you quit xemacs without saving what's in the 'scratch buffer' xemacs will assume that you don't want to save it and happily quit. Therefore you almost never want to write anything there. You will want to open a new file and start writing there.
xemacs is a very old program and decends from an even older program: emacs. These programs predate windows editors and their machintosh inpirations and use a different set of terms.
Lets create a new text file using xemacs (something you will
have to do for all of the labs) to tell me who you are and what you
did in the lab
First lets go to the file menu, click on the
file menu and you will see your opions. You'll note that there is no
"new file" option. Instead you will choose the "open"
option from the file menu. You will get a dialog that looks like
this:

You'll notice that the top part of the dialog is divided into two, the left side show the folders you can choose to move to (again this of the '..' folder the same as the up arrow folder in windows.) While the right side shows the files that are in the current folder.
But we want to create a brand new file so take a look at the part down at the bottom of the dialog where you see the text: 'Find file:" If you want a new file, just ask xemacs to find a file that doesn't exist yet, xemacs will create it for you. In this case create a file called Exercise3.txt by typing that name into the Find file part of the dialog and pushing the ok button.
You are now looking at the new file in xemacs. It should look something like this:
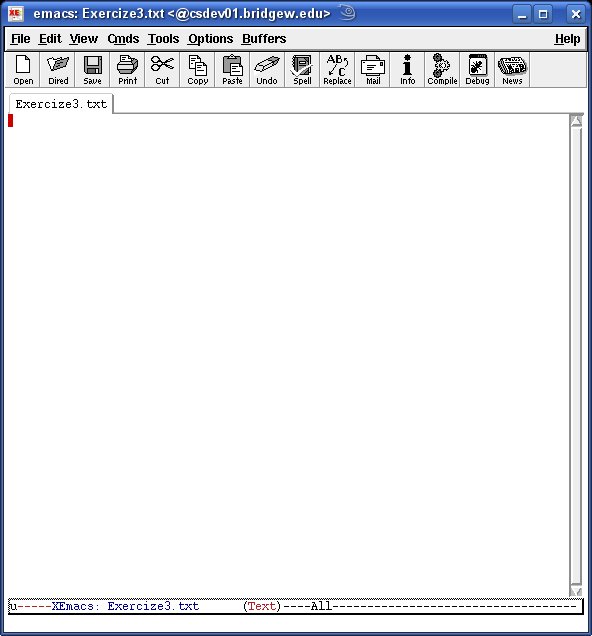
You'll note that the name of your file is on the tab visible above. If you make a change to this file and then try to quit xemacs, the program will ask if you really want to save first before you close. Now put the following information into the text file
*
Now you can save your file by choosing <file><save> or pushing the save button and you can quit from xemacs.
We will be using an online submission system on the csdev01 server itself this semester. I find it useful to walk students through the first submission so we will submit the first time in class., I'll be having you all submit in class and walk you through that first submission. You need to have parts 1-3 done before the beginning of class one week from now.
Submission:
Now move into the directory with the submission system. (I'm looking into a way to skip this step)
cd /home/bscstaff/jsantore/submission/g2/oss
run
./submit.sh
at that point. This will bring up a graphical submit window.
This lab is Due at the beginning of class one week from its assignment (Septh nth for the TR students, Sept nth for the MW students.)
Many Thanks to some of my former University at Buffalo colleagues who first developed the original version of this lab.