Cs102 Spring 2005 Lab3
Due Date: Wednesday Oct 26 at midnight
Summary:
In this lab you will learn to use the ddd debugger on eagle. It is one of the original graphical debuggers. You may be familiar with some of the newer graphical debugging tools such as the one that comes with MS visual studio or Borlands compiler suite. DDD works on the same principle.Read the entire lab before starting work on it, I think you will find the lab easier to do if you have read the entire assignment.
Objectives:
In this lab you will:- Learn how to use a gui-based debugger on eagle to help spot errors in code.
- Continue learning to work with code that is already written - recognizing the effect of existing code
- Work with pointers in your code for the first time.
- Begin learning about the wxWindows library.
- Use code that implements the inheritance relationship.
Your task:
You have been recently hired at a company, and to get you used to their software, they asked you to debug a program for them. A recently dismissed programmer wrote it and told his supervisor "Its all set - it compiles, but I've not tested it yet." After the subervisor compiled the program and tried to run it, the supervisor found that the program immediately crashed. You need to find the bugs in the program so that it meets the requirementsThe Requirements:
When you have debugged the program, it should look something like the following: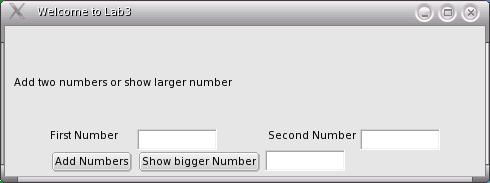
Your borders may be different, but the contents of the window should look like the above image.
The behavior of the application should be as follows:
- If the user presses the "Add Numbers" button
- if there are numbers in the text boxs marked "First Number" and
"Second Number" the text box just to the right of the buttons should
have the sum of those two numbers displayed in it. Note: because of the way floating
point/decimal numbers are stored in a computer, there may be small
adding errors when adding decimal numbers (e.g. 7.1 +2 may be
reported as 9.099999) this is not a problem for you since is is the way
the computer handles numbers. On the other hand reporting 7+9 =14 is a
real problem for you.
- If one of the "First Number" or "Second Number" textboxes do not contain a number, the string "ERROR!" should be displayed in the output text box to the right of the buttons.
- If the user presses the "Show bigger Number" button
- if there are numbers in the text boxs marked "First Number" and "Second Number" the text box just to the right of the buttons should display the larger of the two numbers.
- If one of the "First Number" or "Second Number" textboxes do not contain a number, the string "ERROR!" should be displayed in the output text box to the right of the buttons.
Getting Started
First we need to use a newer compiler. If you haven't recopied my initialization file to get the now one, follow the instructions in lab1 and do so.Remember to logout and log back in to get the effects.
Now copy the files to begin this lab.
cp ~jsantore/lab3Start.zip .
unzip the file
unzip lab3Start.zip
this makes a lab3 directory in your home directory. Change into that directory and look at the files
cd lab3
ls
you have three cpp files, three header files, a Makefile and a copy of the image of the running program. Compile the files:
make Lab3
and great! it compiles just fine. You now have an executable program called lab3 in your directory. Try running the program
./lab3
oops it crashed. So now you need to use the debugger to find the errors. Lets look at the first one together:
First you need to run the debugger on the program. The name of the debugger is ddd, so run
ddd lab3 &
All the '&' character does is tell the program to run in the 'background' so that you get your prompt back to type another command.
When ddd is finished starting up, you can see the code for the app class displayed in the window. To open another file for later debugging, choose <file><open source> You will only need to look at App.cpp, Frame.cpp and Calculate.cpp. The other files listed below those are part of the library and they are not part of the problem.
First we are going to set a 'breakpoint'
A breakpoint is a place that the debugger will stop the execution of the program so that you can view the value of variables and view the exection of your program in slow motion.
Lets set a breakpoint at the beginning of the Lab3App::OnInit() method. (Note that the wxWindows library does not follow our class naming conventions, so there are places where this code deviates from that naming convention unfortunately)
To set a breakpoint, put your mouse over the leftmost part of the line of code, right next to the edge of the window. Right click on that blank space and a menu with four menu items will appear. (if you get a larger menu, your mouse isn't over the blank space) The first menu item is <set breakpoint>, Bring this menu up just left of the word bool that denotes the return type of the Lab3::OnInit() method. Select the <set Breakpoint> item and a red "stop" sign will appear over part of the line. Now tell ddd to run the program (either select <program><run> or push the green <run> button on the little button bar that ddd pops up.
A message appears in the bottom pane of ddd telling you that a breakpoint was encountered. And you will see a green arrow next to the red stop sign.
In a moment we will continue execution of the program, but for now lets watch the value of the variable mainFrame. One nice way to do this is to display its value using ddd. right click on the first place that you see mainFrame. You will get a menu with 8 choices. The second one is <display mainFrame> choose that item.
The variable mainFrame is now displayed - note that is currently has some garbage value since it is uninitialized.
Now we are going to step through the program in slow motion to try to figure out what is going wrong (Generally we do not want to step through the entire program, rather, you want to find the method that you think is causing you trouble and then step through it.)
To step, we will use the step option in ddd (either <program><step> or push the step button on the ddd button bar. Use the step option three time. Watch the value of mainFrame change in the display pane as you step. Note that after the third step, the green arrow has turned red and has a lightning bolt through it. This means that the program has crashed.
We can now see the reason that the program was crashing. Look at the displayed value of mainFrame: it is 0x0 otherwise known as NULL. So the program is trying to call the Show method on a NULL pointer - something that certianly won't work.
Looking a little closer at the OnInit method we see that your predecessor commented out the constructor call that initializes mainFrame for some reason. Quit ddd. Uncomment that line and recompile the program.
Now try to run it. and Hey! you have a window!
of course there are still several more bugs to find and fix, but that is what this lab is all about.
There are either 5 or 6 (depending on how you count) more bugs to find.
None of the bugs will require you to call any method of any wxWindows class in order to fix the bug.
All of the bugs are in the three files:
App.cpp
Frame.cpp
Calculator.cpp
Good luck in finding them. Enjoy.
The wxWindow Library
This program uses several classes from the wxWindow library. It is not necessary to understand all or even most of the classes that are provided in the wxWindow library. However if you want more documentation than is available here you can find the class list and API on the web and you might find it helpful.Below is a list of the wxWindows classes used in this lab and a description of those methods that are used in this lab.
- wxFrame: The Lab3Frame class inherits from this class. It models a main program window
- SetSizer: this method sets the layout for the window. The sizers are all working correctly in this program before you get the program.
- Show(bool) when its parameter is TRUE, the window is displayed, otherwise it is hidden.
- wxStaticText: this is essentually a text label on the window
- no methods of this class are called in the program.
- wxGridSizer: a method of arrainging controls on a window so that each one takes up the same amount of room and all are given equal space in an imaginary grid.
- Add: this method adds a control to the list of controls that the sizer is arranging
- wxFlexGridSizer: a
method of arrainging controls on a window like the wxGridSizer above,
except that this one doesn't use equal space for every control.
- Add: this method adds a control to the list of controls that the sizer is arranging
- wxTextCtrl: this class models a text box on your screen
- GetValue() returns the text in the text box as a wxString.
- SetValue(wxString) puts the string value into the text box and displays the new text.
- wxString : a string class much like the standard c++ string class, but with some additional methods to allow it to work nicely with this library.
-
bool ToDouble(double *val) const: if the text in this string is a number, that numerical value will be placed in the double pointed at by val and the method will return true. Otherwise the method will return false.
- wxButton: represents a push button.
- these are somewhat special. The push buttons don't directly
call any methods, however the two push buttons used here do indirectly
call two methods in the frame class
- Lab3Frame::OnAddButton - when the add button is pressed, this method is called. Review it in the code because it is not guaranteed to be error free.
- Lab3Frame::OnBiggerButton
- when the show bigger number button is pressed, this method is
called. Review it in the code because it is not guaranteed to be error
free.
What to hand in
As usual, you need to submit a zip file with all of your work. (you may omit the object files to save some time and space if you wish.In addition to the code, you need your readme file which should have slightly different sections this time
- Your name
- The names of the files that you are submitting.
- What bugs you found and what changes you made to fix those bugs
and why you think this is the right solution.
- And remaining bugs that you were not able to solve.